Migrate your MongoDB architecture to PostgreSQL, the working way
A hands-on guide to moving from MongoDB to PostgreSQL without major disruptions
At the start of 2022, nearly a year since its launch, the R&D group at Grip Security was experiencing quite a pain point.
We had a centralized database based on MongoDB that all our deployments were using for daily sync and data transfer, and it was getting harder to maintain and keep track of changes. Worst of all, we were using unstructured documents relationally, forcing our code to validate the documents’ structure and data as more types of information entered our pipeline.
We were already using PostgreSQL in a different database, so we figured we could use it in the centralized one as well. I was tasked with spearheading the migration project – defining the new database, writing the necessary code, and converting our system to use the new DB.
This blog post explains our process of migrating our centralized database architecture from MongoDB to PostgreSQL, without too much focus on data transfer. Let’s dive in!
First step: Defining the DB requirements using UML diagrams
Our Mongo database had several unused collections and excess data that no one was querying. We wanted to improve our data model and introduce new relations between our objects. So, the first step was to design the new desired database scheme, based on the existing data structure.
The clearest way of creating the DB structure and explaining the required relations was using a UML diagram. UML (Unified Modeling Language) was created to standardize software systems design. We used structural UML diagrams to help visualize the models (i.e., tables) with their properties (i.e., columns) and the relationships between them using specific connectors and arrows.
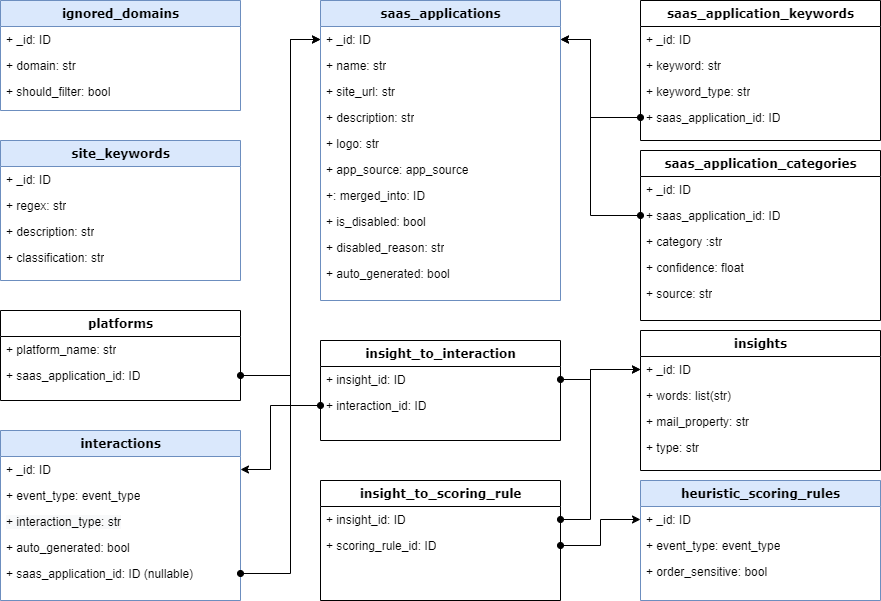
Explanation: The tables highlighted in blue are collections that existed in MongoDB with a similar name. The white ones are new tables to support our models. Note that we have different relationships between models: one-to-many (interactions to saas_applications), and many-to-many (insight_to_interaction, as demonstrated by the linking table).
Using a UML diagram, we could ensure we were creating the correct data structure and could update it without writing (or deleting) a single line of code.
Second step: Defining the initial ORM using SQLAlchemy and Alembic
After we were content with the database structure we designed in the chart, it was time to define these tables in our code. Our product’s backend is mostly written in Python, so we used the SQLAlchemy package to define our ORM1. SQLAlchemy is a Python package that allows you to create Python classes with columns as their properties to define the database tables. It also provides a clear API to query the tables using these classes.
class CorpusInteraction(Base, TimestampMixin):
    __tablename__ = "interactions"
    id = Column(
        UUID(as_uuid=True),
        primary_key=True,
        default=uuid.uuid4,
        server_default=func.gen_random_uuid(),
    )
    event_type = Column(EVENT_TYPE, nullable=False)
    interaction_type = Column(INTERACTION_TYPE, nullable=False)
    auto_generated = Column(
        Boolean, default=False, server_default=false(), nullable=False
    )
    saas_application_id = Column(
        UUID(as_uuid=True),
        ForeignKey(CorpusSaaSApplication.id),
        default=null()
    )
    saas_application: CorpusSaaSApplication = relationship(
        "CorpusSaaSApplication", back_populates="tagged_interactions"
    )
    insights = relationship(
        "CorpusInsight",
        secondary=insights_to_interactions,
        back_populates="interactions",
        lazy="joined",
    )
Explanation: This is a class that represents the interactions table (as evident in the __tablename__ variable), and each member of the class represents a column of the model. For convenience, we can also define relationships as members of the class, that depend on foreign key columns. For example, saas_application is a relationship that is based on the saas_application_id column in the table.
We also needed a way to automatically create the DB tables and track changes made to their structure. That’s where Alembic came in handy. Alembic is a Python package that was made to be used with SQLAlchemy to detect changes made to the ORM and create migrations to be applied to the database. You can think of it as “git” for database changes.
Alembic compares the current defined state of the ORM classes to the one existing in the database and generates the revision automatically (!) listing the changes to be made2.
Once we defined an Alembic workspace for the new database, creating the database (in an initial revision) was as simple as a single command line:
> alembic revision --autogenerate -m "v1"
> alembic upgrade head
Further changes to the structure will be handled in the same manner – creating a new revision and upgrading the database. Easy as pie!
Reference notes:
We chose to define our ORM model in Python, but any other ORM technology could be used instead - if you’re using mostly JavaScript/TypeScript code, Prisma is a cutting-edge alternative that defines the ORM model, generates code automatically for the created tables and handles DB changes by creating migrations automatically.
It is considered good practice to go over the code of Alembic’s auto-generated migrations and make changes if necessary.
Third step: Migrating the data and code to the new database
After we had settled on our desired database model, defined all the necessary relationships, and created an initial migration, it was time to move the data itself - and then came the fun part!
We didn’t need a super-generic solution here – a simple Python script that could read the MongoDB data and build the ORM objects accordingly would suffice! We could use any external third-party software for this task, but we were content with writing a simple once-off script that did the job. We first ran the script locally on a new database to test for failures and bugs, and only then, ran it on our intended production database.
The final task was the most demanding in terms of time and effort. Our centralized DB is used in the production code of our main product, so we needed to make sure the transition was as smooth as possible. To also get up and running quickly with the new PostgreSQL database, we created a module in our code that acted as a “compatibility layer.” Its job was to replace the previous MongoDB functions and calls with SQLAlchemy ones, but convert their results and output to the previous format. We created it so the existing code could still operate without failing because we switched the database infrastructure underneath.
As soon as the compatibility layer was complete and we observed that the production code was still working, we began the important final transition. We slowly switched our code to use the main SQLAlchemy functions and got rid of the compatibility layer - most of them had the same names and parameters!
In a matter of weeks, after we created the populated database, we could use it properly and had gotten rid of all the old Mongo code!
Closing thoughts
Our migration process revolved specifically around MongoDB and PostgreSQL, and it worked quite well in our case. If we were to switch again to a different database infrastructure, we would probably need to build a strong foundation for the new technology first. Because we were already working with PostgreSQL, creating a new DB was easy.
I’m sure there are other things we could improve upon in our process, and I would love to receive your feedback in a comment or even by reaching out via email.
In the meantime, enjoy your fully migrated PostgreSQL database!